

If you have a reborn doll, you have probably stood there with a pacifier in one hand and your doll in the other, wondering how to make it stay without looking like a prop from a toy commercial. I did the same thing with my Lily, and I ruined two good outfits sitting on the floor of my spare bedroom trying to get the angle right. The trick is not to push harder. It is to seat the pacifier the way the mouth is actually shaped, and to know when the magnet is doing the work and when it is just showing off.
The SCOM Reborn Baby Dolls Accessories Set comes with a rainbow transparent magnetic pacifier, a removable reusable bottle, and a silicone pacifier clip, and it has been living in Lily's bassinet since March. This guide covers the safe way to use the magnetic pacifier on a weighted cloth-body doll, what I learned about magnet safety, and the small habits that keep the whole set looking like it belongs on a collector's shelf rather than in a toy bin.
The pacifier set that actually stays put
The SCOM set pairs a transparent magnetic pacifier with a reusable bottle and a silicone clip, all sized for reborn dolls. See today's price on Amazon.
Amazon Check Today's Price on Amazon →Step 1: Check the Magnet Before You Ever Put It Near the Doll
Before I say anything else: the magnet in this pacifier is real, and it is strong enough to hold the pacifier in place through the doll's cheek. That is exactly what makes it useful, and it is also the one thing you need to respect. Take the pacifier out of the set and look at the back of the shield. You will see the small magnet seated there. Run your finger over it once so you know where it sits, then put it down.
The rule I follow with Lily is simple. The magnet never goes near her painted vinyl face directly, and it never goes near a small child. My grandchildren can look at Lily when they visit, but they do not handle her, and the pacifier stays in the bassinet when they are around. A magnet that is perfect for a collector's doll is not a toy for little fingers, and the SCOM listing itself recommends the set for ages 3 and up. Treat it the way you would treat any small part with a strong pull. The first week I had the set, I tested the pull on the edge of the kitchen counter. The pacifier snapped against the metal drawer pull hard enough to startle me, and that was all I needed to know. From then on, the magnet only ever touches Lily's cheek through the shield, and only during a photo session. I also check the back of the shield before each use, because a bit of dust or a stray hair between the magnet and the vinyl will show up in a close-up photo.
One more check before you start. Look at the pacifier shield and the nipple to make sure neither one has a crack or a rough edge. These pacifiers are made to be handled, but vinyl and silicone can pick up a scratch over time. If anything looks damaged, set that piece aside and use another one from the set. This is the same habit I taught in home economics for thirty years: check your equipment before you use it, and you will not have to apologize for it later.
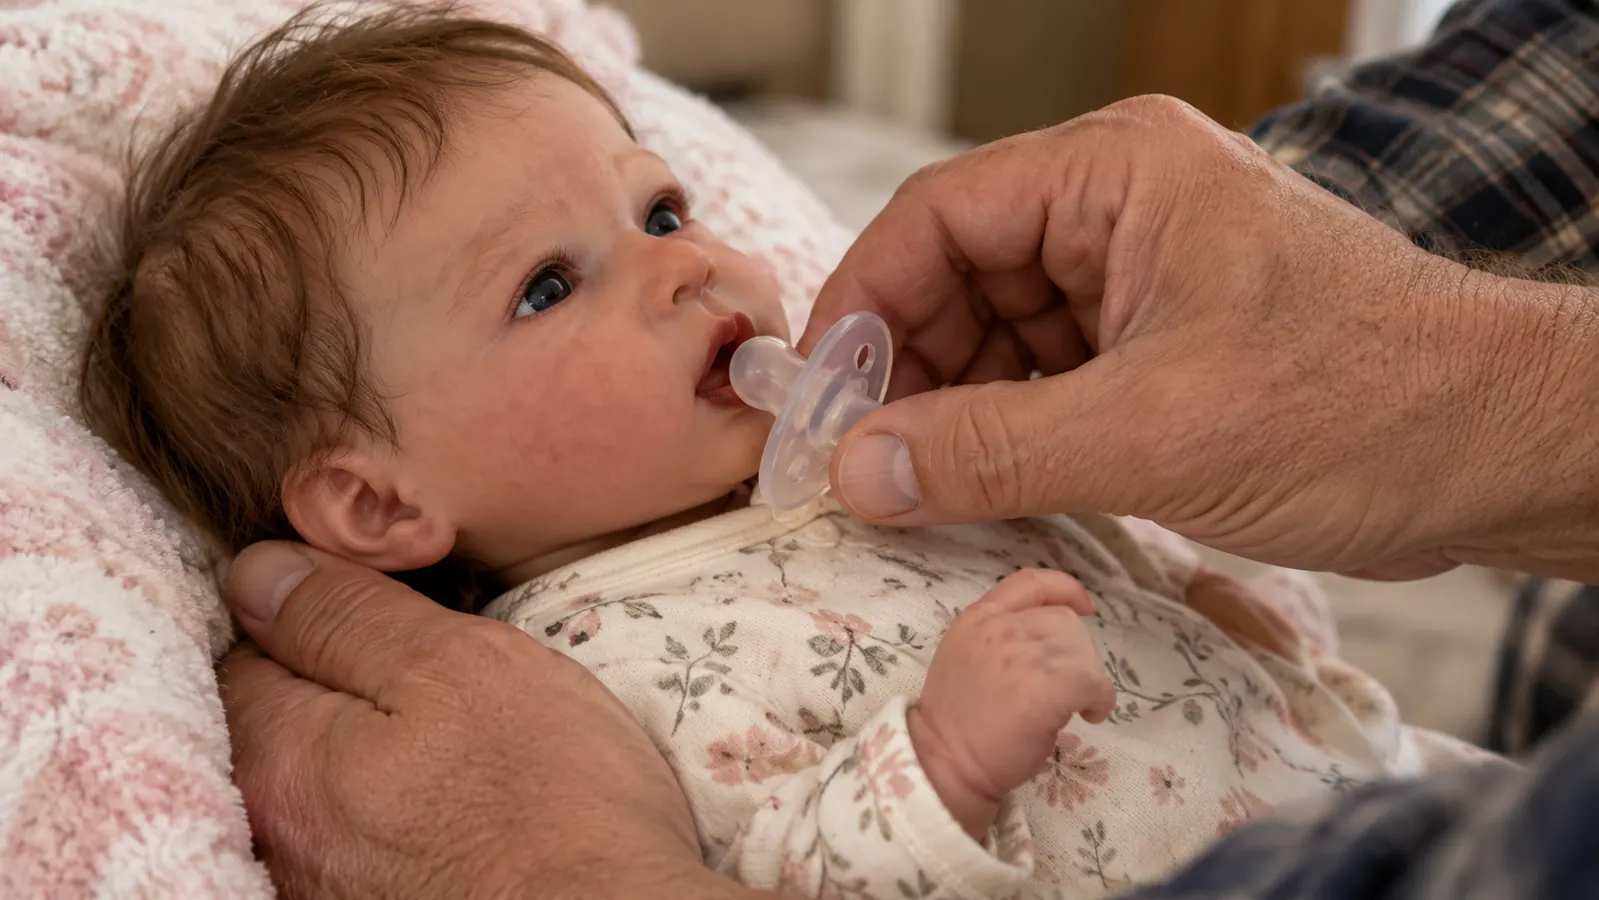
Step 2: Seat the Pacifier With the Shield Following the Cheek
Here is the mistake I made the first time. I pushed the pacifier straight at Lily's mouth like I was feeding a real baby, and the shield stuck out at a funny angle. The magnet clicked against the vinyl, the pacifier slipped, and I sat there for ten minutes feeling like I had forgotten how to use my own hands. It was the second Saturday in March, the day the set arrived, and I was so eager to try it that I skipped the little instruction card in the box. I paid for that. The shield caught on the edge of her lip, the magnet pulled sideways, and the pacifier landed on the bassinet blanket three times in a row. My husband came in to ask what all the thumping was, and I told him I was testing gravity. The real problem was my angle, not the pacifier.
The better way is to approach from the side. Hold the pacifier by the shield with the nipple pointing toward the doll's mouth, then bring it in at a slight angle so the shield rests against the cheek before the nipple fully seats. On a weighted cloth-body doll like Lily, the cheek has a little give, so you can let the shield settle gently against it. When the magnet finds the spot it likes, you will feel a small pull. That is your signal that the pacifier is seated.
Do not force it. If the pacifier will not stay, lift it off, reposition, and try again. The magnet works best when the shield is flat against the cheek, not tilted. Once you feel that pull, let go slowly and watch for a second. If the pacifier stays put, you are done. If it drops, you have learned something about that particular spot on your doll, and you can adjust.
Step 3: Use the Bottle and Clip to Build a Cohesive Scene
The SCOM set is not just the pacifier. It comes with a removable reusable bottle and a silicone pacifier clip, and the three pieces work together better than any one of them does alone. When I photograph Lily in her white wicker bassinet, I seat the pacifier and clip it to the front of her onesie with the silicone clip. It looks like she has just finished a feeding and fallen asleep, which is exactly the story I want the photo to tell.
The bottle is the piece I was least sure about, and it turned out to be the most useful. It is a half-size bottle, sized to match a reborn doll rather than a real infant, and the removable design means you can take it apart to clean it. I keep it on the bassinet shelf with a tiny bit of water in it for photos, and I empty and dry it after each session. The set also includes the pacifier clip, which is silicone and easy to wipe down. One afternoon in May I filled the bottle two-thirds full for a photo and forgot about it until the next morning. The water left a faint ring inside, and it took a good scrub with a soft brush to get it out. Now I only put in a splash, just enough to look real in the photo, and I rinse the bottle out the same day. The clip is the piece I reach for most. It holds the pacifier to the front of Lily's onesie and keeps it from rolling off the bassinet shelf when I am moving her.
Here is the honest part. The bottle is not meant to actually feed a doll, and the pacifier is not meant for a real baby. They are display and role-play pieces for a collectible doll, and they do that job well. If you treat them as props for a scene, you will be happy with them. If you expect them to work like real baby gear, you will be disappointed. Knowing the difference is half the battle.

Step 4: Store the Magnet Away From the Doll and the Sun
When the pacifier is not in use, it should not live on the doll. I learned this the practical way. Lily's bassinet sits away from the window, but even indirect light can be hard on painted vinyl over time, and a magnet sitting against the same spot of vinyl every single day is not doing that vinyl any favors. So when the photo session is over, the pacifier comes off and goes back into the set's storage spot.
I keep the whole SCOM set together in a small basket on the shelf next to the bassinet: the pacifier, the bottle, and the clip. That way I am not digging through a drawer to find the nipple shield at 9 p.m. when the light is finally good for a photo. The set is small, about 5 by 5 by 5 inches in the box, and it weighs only 2.4 ounces, so it does not take up any real space. The basket is a plain woven one I moved out of the kitchen, and it works better than the box ever did because I can see everything at a glance. The box itself stays in the closet with Lily's other things in case I ever take the set anywhere. On the shelf, the pacifier sits with the shield facing up so the magnet is not resting against anything, and the bottle stands beside it with the cap off so it can air out.
The same storage habit protects the magnet. A strong magnet that sits next to a phone, a credit card, or another magnet can cause trouble, so I keep the pacifier away from my phone and my wallet. It is not a dramatic risk with a pacifier this size, but it is a good habit, and good habits are what keep a collection looking new for years.
Step 5: Keep the Set Clean the Gentle Way
Cleaning the SCOM pacifier is easy, and you do not need anything special. I wipe the shield and the nipple with a soft damp cloth and a drop of mild dish soap, then rinse the cloth and wipe again. I do the same for the silicone clip. The bottle comes apart so I can rinse the inside and let it air dry. I never soak the pacifier, and I never put it in the dishwasher, because I do not want to risk the magnet or the vinyl.
The same gentle approach applies to the doll. I do not rub the pacifier against Lily's painted face to clean it, and I do not use any alcohol or harsh cleaner on her vinyl. A soft cloth and a light touch are enough. If the pacifier has been sitting on the shelf for a while, I give it a quick wipe before it goes back on the doll, so there is no dust between the shield and the cheek.
One note about the transparent rainbow finish. It picks up fingerprints the way any clear vinyl does, so I handle it by the edges when I can. A quick wipe before a photo is the difference between a pacifier that looks clear and bright and one that looks smudged. It is a small thing, but in a close-up photo of your doll's face, small things show.
What Else Helps
A few extras make the whole setup easier. A small, soft-bristled brush helps clean the inside of the bottle if you ever use anything other than water in it. A plain white onesie or a knit blanket in the bassinet gives the pacifier a clean background for photos. And if you sew or knit, a tiny crocheted blanket in a soft color makes the scene look finished without costing anything. I made Lily a small blanket myself, and it is the thing people comment on most in her photos.
The other thing that helps is patience with the magnet. The first time you seat the pacifier, it may take a few tries to find the spot where the shield lies flat and the pull feels right. That is normal. By the third or fourth time, you will do it without thinking, and you will wonder why it ever felt fiddly.
When the magnet finds the spot it likes, you will feel a small pull. That is your signal that the pacifier is seated, and it is the whole trick in one sentence.
A complete feeding scene for your reborn
The SCOM set gives you the magnetic pacifier, the removable bottle, and the silicone clip in one box. Check today's price on Amazon and see if it fits your doll's nursery.
Amazon Check Today's Price on Amazon →